Showing posts with label Recipes. Show all posts

Monday, February 11, 2013

Pudding Chocolate Chip Cookies

What the?? Who?? 
Yep, It's been another 4 months and I've decided to show you something yummy.

Where have I been you might ask?? Take a look at my last post and you can read my sincere (and entertaining) response to that question!!


At about 11:30 p.m. on Saturday night I remembered that Greg and I had promised our Sunday School class goodies...and 16 & 17-year-olds don't forget promises that involve sugar. So....I did a quick brainstorm, in my brain, and realized that I could easily get up like 2 hours early and just make some cookies before class to take - No big deal.

Well, fast forward to 9:00 a.m. Sunday morning and I'm putting the ingredients in the mixer and start looking all over the kitchen for a box of Vanilla Instant Pudding mix that I SWEAR I had (I still swear I have an extra one somewhere but it was never found). So, I was faced with a slight problem...I had already started mixing ingredients, so I couldn't really change the recipe and go for another cookie. I was left with a decision - I had a box of chocolate pudding and Oreo pudding mix, I chose the chocolate pudding with a quick prayer that it would somehow be just as amazing as the vanilla version.


They were AMAZING!!! Now I want to try this recipe with every type of pudding mix there is (except maybe pistachio and tapioca....). These were moist and yummy and delicious and each of the kids in our class had at least 5. They got passed around again, and again, and again...until the container was empty!!

So, I now give you this amazingly tasty (and SUPER simple) recipe for some amazing little cookies that you can make for someone special!!

PUDDING CHOCOLATE CHIP COOKIES

1 cup butter (2 sticks - DON'T substitute margarine, or Crisco or anything other than good old fashioned butter!!!)
1/4 cup sugar
3/4 cup brown sugar
2 eggs
1 tsp. vanilla
5.4 oz. box instant pudding mix
(It's the large box which I believe is now 5.6 oz....original recipe was for vanilla, but chocolate is amazing too...maybe butterscotch??)
2-1/4 cups flour
1 tsp. baking soda
12 oz. bag chocolate chips (about 2 cups)

**Mix in order and bake for 10 minutes at 350 degrees.

I used my stand mixer and I kid you not, these are some of the easiest cookies I have ever made! I also used my Pampered Chef cookie scoop, but I used the smallest one because it makes LOTS of cookies which was perfect for a large crowd. If you use a larger cookie scoop (larger than a tablespoon) make sure they are cooked all the way at the 10 minute mark. 

I hope you get a chance to try these, and if you do please leave a comment below to let me know how they turned out!!! Thank you for stopping by and hopefully I'll start posting more recipes. I've been doing LOTS of new baking, but with everything going on I just haven't had time for blogging!!


Tuesday, October 16, 2012

I'm back...with Mint Frosted Brownies!!

Are you there?? I'll be impressed if you are...it's been a while, 4 months to be precise (give or take a few days). I'm not going to make a bunch of excuses for you as to why I took a blogging hiatus, I'm going to be brutally honest - I just didn't have enough time to fit everything I wanted to do into every day and lets face it, blogging is fun, but since it doesn't pay the bills it falls into a lower priority than lots of other things. In case you're new, or it's been so long you've forgotten, here's a list of what I have to squeeze into my days:

* Working - I work 40 hours a week from home as a Medical Transcriptionist.
* Being a mom - I have 3 kids ranging in age from practically 6 (in 4 days) to 16 months...things are a little hectic all the time.
* Being a wife - yes, this takes time out of my day...there is more to being a wife than hanging up your husband's shirts and makin' the babies. I try to do little things throughout the weeks to make his life easier when he gets home so he can spend the maximum amount of time with the kids possible. I try to get things like dishes and laundry and meals all in order so he doesn't have to stress. Sound a little too "Brady Bunch" for you?? Well, that's how it works around here...I enjoy the responsibility and let's face it, my salary isn't enough to pay the mortgage, so if I want to keep living in this house I have to keep the man who brings home the money happy!!
* Homeschooling - Karyl is in first grade this year and while I love that things are more structured and we have more direction in our schooling, there is definitely more one on one time needed...and to be honest, I love it!! I can't wait for the day when I don't have to work anymore and I can focus lots more time on homeschooling...it sounds crazy, but it's so much fun!!
* "Me time" - No, I don't mean playdates, "girls nights" or anything like that. I mean meaningful time for me to take a breath and remember why I'm working so hard for the kids and hubby. I haven't been able to do as many little things for me as I used to, but I still try to find ways to de-stress and do something for me...sometimes it's reading a book for 10 minutes while pretending to be in the bathroom (come one, every mom has done it...), sometimes it's using laundry folding time as an excuse to watch that episode of New Girl I DVR'd last week that I haven't had a chance to watch yet.

I used to think I was SuperMom and could do anything...then I had 3 kids and realized that I might be awesomeness personified, but I can't do it all. So I've reorganized and realized what my priorities really are...and for the past few months they didn't involve blogging. I come to you now as a new woman...literally! I've really dug my heels into this weight loss attempt and have been really successful! The Moms View Makeover was the start of that journey and it has just gained momentum. I have started "running" (mostly walking but slowly being able to run more and more) and I've made exercising a priority instead of feeling guilty about taking the time to do it. Some days I go to classes at a local fitness studio called 4 Everybody Fitness...some days I go out running after Greg gets home. It just depends on what my mood is for that day and what options I have as far as babysitting. Recently my mom moved about a mile away so she's close and has been spending lots of time with the kids. It's been a real blessing because before to take the kids to my exercise class I had to take almost 2.5 hours from work because I had to get them up, get them ready and fed and haul them down to the studio (they have free babysitting and I know most of the women who babysit there). Not to mention, I had to wake them up earlier than normal! Now, my mom comes over and I can get breakfast all set up and get our youngest up and changed...then she just hangs around while the older ones stagger out when they are ready to get up. I miss less time from work (my work is based on production, so the more I miss, the worse it is) and the kids don't have to get up early!! And I can enjoy my hour there and just focus on sweating off some serious calories!!

Now...enough about me, on to those mint frosted brownies I mentioned in the title!! Every Sunday around here we have movie night and we take turns choosing the movie....the person who chooses the movie also gets to work with me and decide what special treat we are going to make. This past Sunday I decided to make these brownies and they were not only DELICIOUS, but super easy!!

I made the brownies from a cheap boxed mix (they were fudgy and amazing!!) in a 9 x 13 glass pan and I added like 2 handfuls of chocolate chips to the mix for some extra yumminess!

Then, when they were cooked and cooled I spread this frosting on top...
2 cups powdered sugar
1/2 cup butter, softened
1 Tbsp water (or milk)
1/2 to 3/4 tsp mint extract
3 drops green food coloring

Beat all that goodness until it's smooth and fluffy (a few minutes) then spread it on!!

I stored them covered in foil (not that they lasted that long...) and I swear that mint frosting is the best thing I have ever tasted. That might be because it has s stick of butter in it, but whatever it is, it is delicious!! I would imagine you could use the same recipe for other flavors with extracts (orange, peppermint, lemon...) just be conservative with the amount of extract you start with and taste test constantly.

So, that's what been going on here and there's a quick recipe for a quick treat for you!!

I am going to try and come back into blogging, but you can also see what's going on by going to our YouTube channel...if you want to, you know!!

Baun Family YouTube Channel

Have a great week!!!

Friday, June 22, 2012

Homemade Cookie Dough Ice Cream

Yep, you read that right...homemade cookie dough ice cream!!  We recently acquired an ice cream maker and I swear it has changed our lives.  We will never again need to (or want to) buy that cardboard carton of frozen preservatives they sell at the supermarket!! We have a pretty decent vanilla recipe that we can add anything to, and since Chocolate Chip Cookie Dough is Greg's favorite flavor, I thought I'd throw some together for him.

I remembered a while back finding an eggless recipe for "cookie dough" that was meant for truffles, but could be used in ice cream - so I did some Google-ing and found it!! The recipe is below!! It makes quite a bit, so if you use it for ice cream you'll have plenty left over to just eat...and that's the best part, you can eat the cookie dough without worrying about getting salmonella!!!

1/2 cup (1 stick) butter, softened.
1/4 cup granulated sugar
1/2 cup packed light brown sugar
2 tablespoons milk
1/2 teaspoon vanilla
1-1/4 cups all purpose flour
1/2 teaspoon salt
1/2 cup mini chocolate chips

*In a large bowl beat butter and sugars with electric mixer until light and fluffy (about 3 minutes).
*Mix in milk and vanilla.
*Add flour and salt and mix on low until combined.
*Stir in chocolate chips.

Chill the dough in the fridge for about 30 minutes to get it firmer before adding it to ice cream...and eat what's left!! Store it in an airtight container and it will last up to a week in the fridge.

Note: I cut it up into little squares to add to the ice cream maker, and add it when the ice cream is almost done (mostly solid but still kinda soft).

You could also roll them into balls and cover with chocolate for cookie dough truffles!!

Or, you could just grab a spoon and indulge...go ahead, I won't judge you!!

EASE OF PREPARATION:  5!!!!
OVERALL TASTE:  5!!!

This one is a winner all the way!! I will edit this post later and add a picture of our ice cream when I have a chance!!

Tuesday, June 12, 2012

I'm back!!!

Well, I have lots of recipes and fun things that I've been wanting to post, but apparently Google has decided to strong arm everyone into using Google Chrome. They made it virtually (and literally) impossible for me to post anything because I use Internet Explorer...and I refused to change just because they said so.

But, I love this blog and sharing my experiences more than my browser pride, so I sucked it up and downloaded Google Chrome - however, I will ONLY be using it for blogging....nothing else!!

So...I have lots of stuff to blog about!!! We made Maple Bars from Make Lemonade and More!, I made some Lofthouse Style Sugar Cookie Cars from Just Get Off Your Butt and Bake, and some Double Chocolate Banana Bread from The Sisters Cafe.  All three of the recipes were hits around here and I would recommend you giving them a try!!

First up we'll cover the Maple Bars from Make Lemonade and More!


Oh yes, that is one FINE looking donut!! The best part?? That puppy is BAKED, not fried!!


Since this post is going to have lots of stuff I'm just going to post links to the original blog posts and you can go there to get the recipes and see how it was originally done!!

Side note for these donuts - only frost them all if you are eating them that day, otherwise just frost what you plan to eat and store the frosting until you are going to use it. After a day, the frosting started to separate and slide off the bars...not a pretty sight!!

EASE OF PREPARATION: 4 out of 5 (I have limited dough rolling space so it was a nuisance)
OVERALL TASTE: 4 out of 5


Next is Double Chocolate Banana Bread from The Sisters Cafe

I apparently didn't take a picture of this, or the cookie bars below so you'll have to trust me that they turned out just like the pictures from their respective blog homes and give them a try!!


My only suggestion with this one is to WATCH THE BAKING TIME.  Our oven always takes longer than most to cook, and I had set mine for the minimum suggested time of 60 minutes and my bread was overcooked. I would check it after 50 minutes and see if a knife or toothpick comes out clean....let's face it, no one likes burned banana bread - and NO ONE wants to waste perfectly good chocolate bread!!

EASE OF PREPARATION: 5 out of 5 - it's quick bread, 'nuff said
OVERALL TASTE: 4 out of 5 - Maybe I wasn't in a banana bread mood when I tried it, but others would have given it a 5 out of 5!!


Last, but certainly not least are the Lofthouse Style Cookie Bars

These were DELICIOUS!!! So much better than I had thought they were going to be!! A perfect treat to take to friends and anyone else who might need a sugary boost!


On this one I have nothing to add, they were perfect in every way...but I swear that everything from Just Get Off Your Butt and Bake always is.  If you ever want a recipe that you KNOW will turn out amazing, get one from this website. I have yet to make one recipe from her that doesn't turn out as awesome as hers did!!

EASE OF PREPARATION: 5 out of 5
OVERALL TASTE: 5 out of 5 - these were super yummy, the kids even loved them!!


I'm sorry this post is short and sweet (really, really sweet) but I finally am able to post and wanted to do it while Nicole was napping and Freddie and Karyl were entertained by Dora...finding free time with 3 kids is proving to be more and more difficult!!

Give these recipes a try and then let me know in the comments how they turned out for you!!


Wednesday, March 28, 2012

Time to make the donuts!!!

Do you like donuts???


Yeah, so do the kids...

I like them too, but can't stand how greasy they are when you get them from a donut shop...it doesn't bother the kids, but when you get old and don't have a gallbladder anymore greasy isn't your friend!

So, another wonderful mom shared this cake mix donut recipe with me from a blog she watches and we tried it tonight. They may not look as pretty as they could, but they are DELICIOUS - and WAAAAYYYY better than any donut shop donut.

Seriously, after eating these I don't think I can ever eat another donut shop donut again.

These are cake-like and BAKED, not fried, so they are light and yummy and delicious and scrumptious and amazing!

Here's the link to the blog with the original recipe. Here are my changes....

*We used a strawberry cake mix...still delicious!
*I used an equal amount of sour cream instead of buttermilk (Yeah, I'm cheap like that)

Give them a try...and let me know what you think!!


EASE OF PREPARATION: 5
OVERALL TASTE: 5!!!!!!!!!

Go...now...they are calling you....

Monday, March 26, 2012

Chocolate Peanut Butter Cake

This past weekend I bought a little cookbook from the checkstand at Stater Brothers from Taste of Home called Cake Mix Treats...all of the recipes start from boxed mixes and that sounded yummy and fun to try!!
So I decided to try my first recipe from it on Saturday and picked an easy one that Karyl could help with...here's what we chose:

CHOCOLATE PEANUT BUTTER CAKE


The best part about it other than how yummy and easy it was?? It looked EXACTLY like the picture in the book, which is the picture above!!
Here is the recipe....the kids LOVED this one but a word of warning - because it is so moist it crumbles easily and doesn't lend itself to eating with little hands, so utensils are required and crumbs will need to be swept up afterwards!!
Ingredients


•2 cups miniature marshmallows

•1 package (18-1/4 ounces) chocolate cake mix

•1-1/4 cups water

•3/4 cup peanut butter

•1/3 cup canola oil

•3 eggs

•1 cup (6 ounces) semisweet chocolate chips

Directions

•Sprinkle marshmallows into a greased 13-in. x 9-in. baking pan. In a large bowl, combine the cake mix, water, peanut butter, oil and eggs; beat on low speed for 30 seconds. Beat on medium for 2 minutes or until smooth. Pour over marshmallows; sprinkle with chocolate chips.

•Bake at 350° for 30-35 minutes or until a toothpick inserted near the center comes out clean. Cool on a wire rack. Yield: 12-15 servings.

See - super easy and ready in no time.

EASE OF PREPARATION: 5!!!
OVERALL TASTE: 4
     I loved that I could taste the subtle peanut butter flavor and that the marshmallows made it super moist, but it was almost too stick-to-the-roof-of-your-mouth moist - so make sure you have a glass of milk nearby because this dessert will leave you asking the age old question "Got Milk??"

Give it a try and let me know what you think of it!! I am going to try and get back to at least one recipe a week on here...Pinterest has given me some amazing inspiration and I am finally at a place where I feel like I have a few extra minutes a day where I can get on here and post. Working full time from home with 3 kids is definitely much more time consuming that with just 2 kids - but just as worth it!!

Thursday, September 8, 2011

Ring Around the Veggies!!!

My friend Claire made this yummy dinner for us a while back and I fell in love!! She gave me the recipe and I just got around to trying it last week. This was WAY easier than I had thought it would be to put together, and I had fun making it my own. The basic recipe is from the Pampered Chef and you can see it by clicking on the title of this post, or here ----> Chicken and Broccoli Braid


Here is a picture of the ring before I put it in the oven.  I put it on parchment paper so it would be easier to serve...I hate it when stuff sticks to the cookie sheet!!  All I did was take the triangles from the crescents and overlap all the wide ends in a circle, scoop the filling around the inner circle and then pull the pointy ends over and squish them together in the middle!!! Easy-peasy!!!


Look at how beautiful and golden brown this looks!! It was delicious with the buttery crescents on the outside, and the inside was a delicious mix of cheesy and yummy!!


Here's the recipe as I made it:

1 cup chopped broccoli florets

1 cup chopped carrots

2 cups chopped cooked chicken breasts

1 cup shredded sharp cheddar cheese

1/2 cup Miracle Whip or mayonnaise
 
2 tsp Dry Ranch Dressing mix
 
1/4 tsp salt

2 pkg (8 oz ) refrigerated crescent dough - NOT the extra fluffy, I used the Stater Bros. cheap ones.


I cooked this at 375 for about 25-28 minutes, I basically just waited for it to get nice and golden brown on the top.

Just so you know, I added carrots to the mix and left out the red peppers. I also, per Claire's recommendation, used a little ranch dressing mix instead of the dill mix in the recipe.  I also used Miracle Whip instead of mayonnaise because that's what we keep stocked around here!! I steamed the broccoli and carrots beforehand because Greg and the kids prefer the veggies soft, and I wanted to make this as family-friendly as possible!! You can check out the original recipe for a more sophisticated version, theirs has slivered almonds and an egg wash on it as well...I didn't want to waste the time!!

I absolutely LOVED this meal and will be making it again...although next time I think I'm going to try it with a taco salad theme...meat seasoned for tacos and cheese, maybe beans and a few other things. You could really get creative with this and have some fun!!!


Wednesday, August 31, 2011

It's been a while, I know....Bagel Pizza Lunch

Sorry for the blogging hiatus, but with a new baby and our first year of homeschooling things have been a little crazy lately!! I have been baking recently, but since I have a basic point and shoot camera from Costco I tend to get frustrated that my pictures don't turn out anything like the pictures on the blogs I love...can you have photo envy??

So...today I am starting with a quick lunch idea that is kid friendly and I even enjoyed eating it with them...

Today for lunch I made Bagel Pizzas....here's what you'll need...

Bagels
Pizza Sauce (I used leftover sauce from when we made spaghetti a week ago)
Shredded Cheese

This one is super easy, super quick and super yummy!!

Turn on your oven to 350 degrees
Line a cookie sheet with foil and put as many split bagel halves on there as you need
Spread a thin layer of pizza sauce on to each bagel half
Sprinkle a generous amount of shredded cheese on to each bagel half

Now, put that in the oven for like 10 minutes or so...I just watched them through the door and when the cheese was sufficiently melted I took them out.

Cut them into quarters with a pizza slicer and serve 'em up!

Now, you could also add toppings if you had them laying around...I don't have things like pepperoni and sausage lying around, but if you do, add them to the pizza!!

For the adults eating these, I dipped mine in Ranch dressing like I would regular pizza and they were really good! I loved that they were soft and easy to eat for the younger kids, and I didn't have to chew through a crunchy bagel (this was why I didn't try the broiler)!

So, give it a try for lunch one day - it was super fast to get ready and cook, and I served it with a cup of applesauce for a well-balanced lunch!

Monday, March 14, 2011

Chocolate Chip Cheesecake

Let me start out by apologizing for the missing followup post on the Chicken Noodle Casserole...I did indeed make it that night, and it was a dud.  Hubby thought it had no taste, and I agreed.  The kids ate it, but they were really hungry, so that wasn't a good judge of taste either!!  So, I decided to just chalk it up to a new experience and move on.....to dessert!!!

CHOCOLATE CHIP CHEESECAKE

I got this recipe from a Nestle Eagle Brand Cookbook that I got a few years back that is full of desserts, desserts, and more desserts.  I had some cream cheese that was coming up on its lifespan (don't worry, it didn't expire until the end of the month) so I decided to do something with it....I'll show you my pictures, and then have the recipe at the end.

I started out with a home made Oreo cookie crust in a 9 inch springform pan.  You can't see it, but I lined the bottom with parchment paper....a springform pan's best friend!!!


Then I "sprinkled" a cup of chocolate chips on top of the crust...mmm...chocolate deliciousness....


Then I beat the cream cheese, sugar and vanilla until it was smooooooooth.....


I then added a little at a time of eggs, flour, evaporated milk (NOT sweetened condensed milk) and sour cream....then poured it on top of the chocolate chips and crust....and sprinkled another cup of chocolate chips on top of that (I think I see where they get the name for the cheesecake from now....)


I then put it in the oven and grabbed the camera and came to the computer to blog this delicious event.  I am trying to be better about blogging more, so I figured there wasn't a more perfect time than while it was in the oven (don't worry, I will come back and post a picture of the finished product when it's done!!

This is a kinda fuzzy picture from the cookbook of what it SHOULD look like...we'll see how close I get to the professionals!!


INGREDIENTS:

About 15 Oreos made into crumbs (one sleeve from the Costco box)
2 Tblsp. melted butter
2 cups chocolate chips, divided
2 packages (8 oz. each) cream cheese
1/2 cup granulated sugar
1 tsp. vanilla
2 eggs
2 Tblsp. flour
3/4 cup evaporated milk
1/2 cup sour cream

For clarification, the Oreo crumbs, butter and 1 cup of the chocolate chips are for the crust...the remaining ingredients are for the filling...and the last cup of chocolate chips goes on top!!

Doesn't that sounds delicious??? I asked my family if anyone wanted me to save them a piece and my husband texted me back that his entire team wanted a piece...maybe we'll send a few small pieces their way tomorrow, I love getting feedback from other people, and it means the calories don't stay in the house for me to eat!!!

Alright, that's the buzzer, I need to go put some foil on top and let it finish...can't wait to post the after pictures!!!

Thursday, March 3, 2011

Child friendly chicken noodle soup...sort of....

So today I have been dinking around while I'm "working"...looking at blogs, getting kids endless snacks and constantly restarting new episodes of Bubble Guppies on TV for our 4-year-old...

While browsing the web I ended up on The Tasty Kitchen through Pioneer Woman...and there was a recipe on their blog - Chicken Noodle Soup Casserole (Clink on the link for the recipe).

I read it through and instantly decided it was perfect for dinner tonight.  The hubby has been sick the past 2 days and what better way to say you care than to make him a new-age Chicken Noodle Soup, right?? And I HATE serving the kids soup because it just makes a mess and ends up all over them and my floor...so I LOVE the chance to make the same flavors, but with more child-friendly options.  Anything my 2-year-old can eat by himself with a fork is a winner in my book!

I have everything to make this save the celery, garlic and onion, but there's a killer sale at Albertson's this afternoon on spaghetti sauce that I'm going to hit up, so I will be sure to get some of those things while I'm there.  I will make sure to take pictures and then let you know how it is tomorrow!!!

See, I told you I'd be back!! Hopefully I can find and post lots of good recipes for all 3 of you to use that read this blog.

Adios!!

Sunday, October 10, 2010

Beef Stew

First off...the pretzel dogs were not what I expected.  I took pictures, and maybe I'll post them another day - but they looked better than they tasted.  They have you boil them in a baking soda and water bath, supposedly to give them a crispy outside...they were just WAY too salty tasting!  I think I am going to go the pigs in a blanket route next time and wrap them in the dough-in-a-can croissants!!

OK...Beef Stew....DELICIOUS!!!!

I know, what kind of blogger doesn't post pictures - I have been feeling kinda under the weather for the past week or so and quite honestly I don't want to go through the process of downloading them...so take it from me, the beef stew looked totally normal, and it was delicious!!

Here's what you'll need....
-A Crock Pot
-About 1-1/2 pounds of beef stew meat (go to the meat section at the grocery store, the butcher will show you)
-A small bag of baby carrots (I think it was a one pound bag)
-About 4 medium sized potatoes
-An onion
-Two 8-ounce cans, or I used one 15 ounce can of tomato sauce (Not marinara sauce).
-Some pepper, seasoning salt...maybe a bay leaf.


Alright - here's what I did...
I cut up the stew meat using my deadly sharp kitchen shears into smaller pieces so it was child friendly.  Then I used my Vidalia Chopper (but you could obviously just use a knife) to cut the carrots and potatoes and onion into the desired size pieces and throw them into the Crock Pot with the meat.  Put your seasoning on now (pepper, seasoning salt, a bay leaf) and mix it all up.  Then pour your tomato sauce on top, mix it around a little and then let it cook!!

I put in on High for about 5 hours and then left in on low until my husband got home at around 8:30pm....I started it around 1pm I think....The recipe said to cook on Low for 8-10 hours, but I've learned that with the Crock Pot you can put it on High for a while at the beginning to make up for lost time and then turn it down and let it go to low later.

This was REALLY good, the meat was super easy for the kids to eat and the veggies were plenty soft.  Obviously, if this was for a more mature audience you could cook it less and not have the veggies get totally mushy, but that's a personal preference!

Please let me know if you have any questions, or if you try it!!

Thursday, October 7, 2010

Pretzel Dogs

I got a photo message on my phone from my wonderful husband the other day who has far too much faith in my cooking skills, showing a picture of a picture of an odd looking pretzel with the caption "Do you think you could make this?"

After a few attempts to connect back and forth I got him on the phone and he told me what it was....and asked if I could figure out how to make a "pretzel dog."  I told him with all the phony confidence I could muster "Sure, I could do that...give me a few days and I'll make them for you."  I can't help it, talking to him makes my brain go to mush and I don't think very clearly.  I had NO idea how I was going to go about making those pretzel dogs...the closest thing I could think of was wrapping a hot dog in a croissant - which I have actually done before in a bite-size form.  But I was guessing it was the pretzel portion of the food that got his attention, and we all know croissants aren't the same thing.

So, I did what any devoted, loving wife and mother would do in my situation...I turned to the all powerful Google and BAM - I found exactly what I was looking for.  I also found a new cooking website that I am in love with - A Dash of Sass.  I will post the link to the blog and recipe below.

Tonight I am going to attempt to make the ever tasty pretzel dog...and I will let you know how it goes.  I think it will be rather yummy, but you never know!!


By the way, I have been doing a lot of cooking, I just haven't been good about posting.  I know, kind of disappointing.  I am going to try and do better now that I have a more definite schedule and have more energy from all the exercise!!

Thursday, September 2, 2010

Lemony Blueberry Goodness....with sugar on top....


I thought I had pictures, but I guess I was wrong!!

You can look at the pictures on the Get Off Your Butt and Bake Website....mine ended up looking exactly the same, maybe with a little thicker coating of icing!!

These were super easy and were moist and yummy!!!

Enjoy and feel free to post a comment if you make them and end up loving them too!!

OVERALL TASTE: 4
EASE OF PREPARATION:  4

A general winner all around...I think I am going to try them with chocolate chips next!!

Monday, August 23, 2010

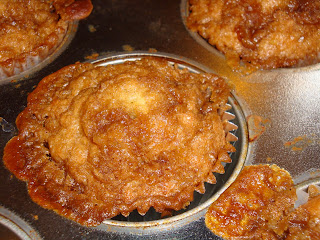
Brown Sugar Crumble Banana Muffins

The BEST banana muffins ever!!


This is a mixture of like 3 different recipes...I took my favorite parts from each and made this delicious treat
And no, the pictures don't do it justice!!

These are a moist and yummy banana muffin topped with a brown sugar crumble....with a powdered sugar glaze on top.

Here is the recipe:

BANANA MUFFINS
1-1/2 cups all-purpose flour
1 tsp. baking soda
1 tsp. baking powder
1/2 tsp. salt
3 ripe bananas mashed
3/4 cup sugar
1 egg slightly beaten
1/2 cup butter melted

BROWN SUGAR CRUMBLE
1/2 cup brown sugar
2 tbsp. melted butter
1/4 cup flour
1 tsp. cinnamon

POWDERED SUGAR GLAZE
1/2 cup powdered sugar
1 tbsp. milk

Directions:

Preheat the oven to 375 degrees.

MUFFINS
-Mix the dry ingredients (flour,soda,powder,salt) in one bowl.
-Mix everything else in another large bowl with an electric mixer until well combined.
-Add the dry ingredients to the wet ones and mix with the mixer until well combined.
-Fill 12 muffin cups 2/3 full with the batter (this recipe should make 12 muffins). Make sure you don't overfill the muffin cups!!

BROWN SUGAR CRUMBLE
-Mix all the ingredients in a bowl with a fork (it works great when you push with the back of the fork to combine everything.) Stir it up until everything has been mixed evenly and it looks uniform. 
-Using your hands (it works best) simply "sprinkle" or attempt to evenly distribute the brown sugar mixture over the tops of the muffins.  There is enough topping to cover them completely, so don't be stingy, lay the stuff on!!

Place the muffin pan in the oven for 18-20 minutes.  Muffins are done when a toothpick inserted in the middle comes out clean.

Make the glaze while the muffins are in the oven and set it aside...stir it with a small whisk or a fork.  You will want to mix it up again right before you drizzle it because it will start to harden a little while you're waiting.

When completely cooked, remove from the oven and place the pan somewhere for them to cool.  Take them out and place them on plates or a cooling rack with wax paper or foil underneath when they are still warm, but cool enough to handle.

Drizzle the glaze over the tops of the muffins, like the brown sugar crumble, don't be stingy!! Just like the picture, you can really be gracious in your drizzling!! Then just let the muffins sit and cool.  They do not need to be refrigerated when cooled, but I doubt any will last long enough for you to worry about that!

OVERALL TASTE:  5!!!
EASE OF PREPARATION:  5

THIS ONE IS A WINNER AND WILL BE MADE MANY, MANY MORE TIMES!!

Monday, August 2, 2010

Scotcharoos


Let me start by apologizing for my lack of skills in the photo department....For some reason I am still convinced that my little point and shoot Sony CyberShot can work miracles with pictures...it can't.  I am going to start using Greg's camera, the much more professional one that he bought before we had 2 kids, a minivan and a mortgage.....

On to the recipe...Scotcharoos....
The best way to describe these is that they are almost like a peanut butter Rice Krispy Treat with chocolate on top.  Sound yummy??  Read on!!!

The Recipe:

1 cup Karo syrup (corn syrup...I use light)
1 cup sugar
1 cup peanut butter
6 cups Rice Krispies (or the Stater Bros. generic alternative!!)
1 cup chocolate chips
1 cup butterscotch chips

The Directions:

- In a large pot combine the Karo syrup (corn syrup) and the sugar on low-medium heat.  Mix until combined (about 4-5 minutes depending on the pot and stove)...turn the heat down if if looks like the mixture is starting to boil and stick to the bottom of your pot.

- Once combined (will be a marble-y clearish white looking syrup) remove from heat (or turn down to SUPER LOW) and put in the peanut butter.  Mix that up until it is all combined and smooth.

- Turn off the stove and remove the pan from the heat.  Now, add the Rice Krispies....stir up, down and all around until every little Krispy looks coated.

- Once all is coated, put into a 9 x 13 dish and pat it down (not tight, just so there aren't huge gaps).

- Set that aside and melt the chips...I do it in the microwave in a Pyrex measuring cup, first for 1 minute at 70% - 80% power, then stir, then another 45 seconds to a minute at the same power level and stir.  If that is not enough you can put it back in for 30 second intervals at the lower power.  Just do lots of stirring to help the chips melt and remember, chocolate chips will burn, easily.   Once melted, spread over the top of the pan.

- Resist the temptation to cut a piece right away....let them cool completely (I put them in the fridge for an hour or so to cool).  If you cut the, too soon, not only will they be hot, but they will fall apart, and fall on the kitchen floor....and you will be left with the guilt of wasting a precious resource!

So, to recap - heat and mix Karo syrup and sugar, when combined add peanut butter.  When that's mixed, turn off stove and add Krispies.  Put in 9 x 13, melt chips and spread them on top.  Let it cool....or else!!

Now enjoy!! These are delicious!!

OVERALL TASTE:  5
EASE OF PREPARATION:  5

Chocolate Zucchini Bread


Does it look YUMMY???
It was good...it was YUMMY warm with some butter...mmm....

Anywho, I made this Chocolate Zucchini Bread a few weeks ago and bragged about it on Facebook while promising to post the recipe at the time...it is now probably 3 weeks later and all I can say is that I am sorry, and I will be legally changing my middle name to "The Procrastinator."

Here is the recipe...

2 cups sugar
1 cup canola oil
3 eggs
3 teaspoons vanilla extract
2-1/2 cups all-purpose flour
1/2 cup baking cocoa
1 teaspoon salt
1 teaspoon baking soda
1 teaspoon ground cinnamon
1/4 teaspoon baking powder
2 cups shredded peeled zucchini

Directions:

- In a large bowl, beat the sugar, oil and eggs and vanilla until well blended.  Combine the flour, cocoa, salt, baking soda, cinnamon and baking powder; gradually beat into sugar mixture until blended.  Stir in zucchini.  Transfer to two 8-inch x 4-inch loaf pans coated with cooking spray.

- Bake at 350 degrees for 50 - 55 minutes, or until a toothpick inserted hear the center comes out clean.  Cool for 10 minutes before removing from pans to wire racks to cool completely.  Yield: 2 loaves (12 slices each)

**A few notes...I halved this recipe and made only one loaf because I didn't want to waste too many resources if it flopped...which it didn't...but so you know, you can easily half this recipe for only one loaf (use 2 eggs) and just watch the time in the oven since it will be shorter.

**Also, I used a microplane zester to "shred" the zucchini because honestly I was worried I would have to chew the zucchini in the bread if I used my shredder.  It worked great!! I doubt the results would be as bad as I had imagined with a regular shredder, but just FYI - the finer shreds worked just fine (just make sure to drain the juice before you dump the finely grated pieces in if you go that route).

So, there it is - Chocolate Zucchini Bread.

I am going to start rating my recipes on a scale from 1 - 5 in two categories....Overall taste (this is in general - I will try to be unbiased and not let any personal preferences influence this) and ease of preparation...

OVERALL TASTE:  3 (with some butter a 3.75)
EASE OF PREPARATION:  4

Wednesday, June 23, 2010

Homemade Pizza and Peanut Butter Cookies

HOMEMADE PIZZA

I want to start this post with something new I tried the other night....Homemade pizza.
Why did I try homemade pizza?? Because I wanted to break out this baby and try it for the first time...


For those of you not familiar with kitchen wizardry, that is a breadmaker.  We got it for our wedding, but we never had enough room to store it remotely near a kitchen, let alone use it, before we bought this house.  So, I finally decided to break it out and try making pizza crust dough - and it worked beautifully!!


It looked great - the taste wasn't quite as impressive though, but I figure at least the machine works, and now I can start looking for a good pizza crust recipe!! 

So....if you have a wonderful pizza crust recipe, please share!!! We love pizza here and I am on the hunt for a good one!!

SHORTBREAD PEANUT BUTTER COOKIES

I decided to make some cookies this afternoon, and of all the recipes I have waiting to be tried, this seemed like an easy one for a Wednesday afternoon.

Just like the Brown Sugar Crumble Banana Muffins, I owe a huge thanks to "Get Off Your Butt and BAKE" for posting this delicious recipe.  The link is below...


I made the dough and rolled it into balls....then rolled those balls in sugar...


Then I flattened them with a fork (not quite as thin as the original recipe, it was hard with all the chocolate chips in there...next time, I will use less chocolate chips) - and then they were sent to the pathetic appliance in my kitchen they called an oven when we bought the place (long story - let's just say that I learned not all ovens are a standard size...and didn't realize it until we had moved in and I tried to bake a sheet cake...)


And this is the yumminess that came out!!! 

My daughter keeps asking me every 10 minutes or so if she can have another one - I'd say they were a hit around here!!!

So we now have a cooling rack full of yummy cookies and I need to go figure out what's for dinner....Mac and Cheese anyone???

Thursday, June 17, 2010

Brown Sugar Crumble Banana Muffins

These are BY FAR the best Banana Muffin I have ever had!! And with the brown sugar crumble topping, they are irresistable....
BEFORE THE OVEN


AFTER THE OVEN


They were super yummy warm out of the oven, but they were also surprisingly delicious the next day when they were just room temperature. Between you and me, I REALLY wanted to heat one up this morning and put some butter on it but I resisted - when you see the recipe you'll understand why, they already have enough butter in them as it is!!
The link to the recipe is below....Please give these a try and let me know what you think!!
Thank you to the "Get off your butt and BAKE" website - this is another winner!!

Monday, May 24, 2010

I'm BA-ACK!!!

I know, it's been a while....like 2 months....

And for all 3 of you who actually look at this blog I sincerely apologize!! Things have been a little crazy around our house and I was seriously lacking in the blogging department. I was sick and then things just crazy around the house with kids and work and life in general.

Now, 1/3 of you might be thinking "but this blog was established to prove that there was in fact 'Life After Diapers'..." and you are right, but that is exactly why I've been slightly lacking lately. My family is my first priority, over work, over my personal life - they come first. For these past 2 months my family just took more of my time than it usually would, and that was mostly due to my lack of energy for the 5 weeks I was sick with a sore throat and other nastiness.

So, here I am, back and with an even greater resolve to bring you more recipes and ideas to help you out!! I have had lots of time to think and one of the things I have been doing is making goals for myself, as a mom, a wife and just a woman in general. I have decided to incorporate a new, SMALL goal every week or two to try and contribute to the general awesomeness I strive to embody - so here are a few of the goals I set over the past 2 months, and how I implemented them...

#1 - The first goal I set was a small one, and it was to keep the dining room table clear - this is an Achilles heel for me because the dining room table is SOOOO convenient for dropping stuff when you just don't have time to put it anywhere else. Our dining room table is also my sewing table, craft table for the kids and I, and just generally a wonderfully flat raised surface used for a multitude of things. So, one weekend my husband went through and "power cleaned" the table and kitchen (he was fed up with the clutter, and I don't blame him one bit!!) - once the table was empty and I had overcome my embarassment with letting it get that bad I decided that it was time to start over new....from that day forward nothing was to go on that table unless it was for a specific project I was doing at the time AND it could be cleaned up quickly and had a place to go when it was dinner time.

That was 2 months ago, and to this date I have kept that kitchen table free of useless clutter!!!

#2 - DISHES!!! I use capital letters because I used to think that dishes was a foul word, one that should be spelled with asterisks and other symbols depicting it's naughtiness (D&%*@#)!! I had a horrible habit of just letting the dishes pile up in the sink with the intention of washing the plastic and other non-dishwasher safe items...and also letting the clean dishes just sit in the dishwasher because, well, I hated emptying it. So, just let your imagination run and this could be a real problem.

Now before you start thinking "eww...isn't that a sanitation problem??" the answer is no...I am VERY picky about rinsing and wiping things off before leaving them in the sink, so the stuff in the sink didn't have day old food clinging to it, it just needed to be "washed" with soap.

So....about 2 weeks later I made the goal that with a few exceptions, I was going to make sure that sink was empty every night. So, I started doing dishes "by hand" every night....and after a few nights of grumbling through it I remembered I had an iPod that had barely been used, and a growing library of songs from a new TV show I was dying to listen to (thank you Glee!!). So, I clipped on the iPod, stuck an earphone in my right ear (for some reason I hear better out of my left ear....so I want to leave that one open to hear children) and started washing dishes....and singing along...

After one night of this I realized a few things - one, dishes aren't that bad, in fact, I wash almost everything by hand now unless there are a lot of dishes or I'm in a hurry, then I put the dishwasher safe stuff like plates and cups and silverware in the dishwasher. Two - I forgot how much I LOVED singing. My whole life throughout school was music, especially Choir in high school. Before I had little ears in the car you would find me driving with the music up so loud the license plate frame was shaking and I would be singing along just as obnoxiously loud; singing and listening to music really allows me a release for stress, and amazingly enough makes me feel better about the world.

#3 - my last goal 2 weeks ago - to try and fold the laundry the same day I took it out of the dryer. I tend to leave 2-3 hampers of clothes sitting and waiting to be folded because I just had a hard time making time to sit and fold it all and put it away. So far I'm definitely doing better than I was a month ago. In fact, right now there are 2 hampers sitting in our room from Sunday, but this is the first time in a while that has happened. It's a work in progress, but I figure any improvement is better than no improvement =)

And my goal starting today....

I have been MUCH better about making "home-made" meals more often and choosing meals based on the sales....and an unofficial goal I made was to try and made at LEAST 2 homemade meals every week.

To go along with that, I am making a goal to try at least one dessert recipe every week (to last through the week hopefully) since the homemade desserts are better for us than the store bought ones, and much cheaper!! AND I will post the dessert and recipe weekly for you to see!! So, below are the dessert recipes I tried this week...


Chocolate Picnic Cake
This recipe came from a Taste of Home magazine and I decided to give it a try on Friday since it was simple and I had all the ingredients...
This cake is described as being very versatile because it has no frosting, so is perfect for lunchboxes, and they saw it freezes well...and I think it would!! I actually added chocolate chips to the cake mix, but I don't think I would do it again, there were enough on the top!


Strawberry Cream Pie

This was the second recipe I decided to make on Sunday because I had a lot of fresh strawberries on hand and some extra heavy whipping cream hanging around....
We have yet to try this pie...it is in the fridge awaiting its fate after dinner tonight....but just from tasting the pre-fridge "batter" things looked promising!!
So, those are my desserts for this week. The chocolate cake is OK, I could see where it would be perfect for a kid's lunch, but I wouldn't make it as a dessert for company - it just doesn't have enough chocolate taste that us women expect from a dark dessert!! I will let you know soon what we thought of the Strawberry Pie.