Thursday, June 17, 2010

Brown Sugar Crumble Banana Muffins

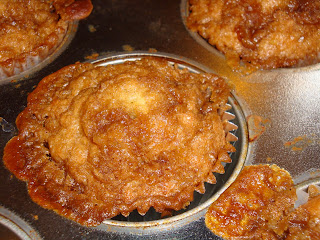
These are BY FAR the best Banana Muffin I have ever had!! And with the brown sugar crumble topping, they are irresistable....
BEFORE THE OVEN


AFTER THE OVEN


They were super yummy warm out of the oven, but they were also surprisingly delicious the next day when they were just room temperature. Between you and me, I REALLY wanted to heat one up this morning and put some butter on it but I resisted - when you see the recipe you'll understand why, they already have enough butter in them as it is!!
The link to the recipe is below....Please give these a try and let me know what you think!!
Thank you to the "Get off your butt and BAKE" website - this is another winner!!

Monday, May 24, 2010

I'm BA-ACK!!!

I know, it's been a while....like 2 months....

And for all 3 of you who actually look at this blog I sincerely apologize!! Things have been a little crazy around our house and I was seriously lacking in the blogging department. I was sick and then things just crazy around the house with kids and work and life in general.

Now, 1/3 of you might be thinking "but this blog was established to prove that there was in fact 'Life After Diapers'..." and you are right, but that is exactly why I've been slightly lacking lately. My family is my first priority, over work, over my personal life - they come first. For these past 2 months my family just took more of my time than it usually would, and that was mostly due to my lack of energy for the 5 weeks I was sick with a sore throat and other nastiness.

So, here I am, back and with an even greater resolve to bring you more recipes and ideas to help you out!! I have had lots of time to think and one of the things I have been doing is making goals for myself, as a mom, a wife and just a woman in general. I have decided to incorporate a new, SMALL goal every week or two to try and contribute to the general awesomeness I strive to embody - so here are a few of the goals I set over the past 2 months, and how I implemented them...

#1 - The first goal I set was a small one, and it was to keep the dining room table clear - this is an Achilles heel for me because the dining room table is SOOOO convenient for dropping stuff when you just don't have time to put it anywhere else. Our dining room table is also my sewing table, craft table for the kids and I, and just generally a wonderfully flat raised surface used for a multitude of things. So, one weekend my husband went through and "power cleaned" the table and kitchen (he was fed up with the clutter, and I don't blame him one bit!!) - once the table was empty and I had overcome my embarassment with letting it get that bad I decided that it was time to start over new....from that day forward nothing was to go on that table unless it was for a specific project I was doing at the time AND it could be cleaned up quickly and had a place to go when it was dinner time.

That was 2 months ago, and to this date I have kept that kitchen table free of useless clutter!!!

#2 - DISHES!!! I use capital letters because I used to think that dishes was a foul word, one that should be spelled with asterisks and other symbols depicting it's naughtiness (D&%*@#)!! I had a horrible habit of just letting the dishes pile up in the sink with the intention of washing the plastic and other non-dishwasher safe items...and also letting the clean dishes just sit in the dishwasher because, well, I hated emptying it. So, just let your imagination run and this could be a real problem.

Now before you start thinking "eww...isn't that a sanitation problem??" the answer is no...I am VERY picky about rinsing and wiping things off before leaving them in the sink, so the stuff in the sink didn't have day old food clinging to it, it just needed to be "washed" with soap.

So....about 2 weeks later I made the goal that with a few exceptions, I was going to make sure that sink was empty every night. So, I started doing dishes "by hand" every night....and after a few nights of grumbling through it I remembered I had an iPod that had barely been used, and a growing library of songs from a new TV show I was dying to listen to (thank you Glee!!). So, I clipped on the iPod, stuck an earphone in my right ear (for some reason I hear better out of my left ear....so I want to leave that one open to hear children) and started washing dishes....and singing along...

After one night of this I realized a few things - one, dishes aren't that bad, in fact, I wash almost everything by hand now unless there are a lot of dishes or I'm in a hurry, then I put the dishwasher safe stuff like plates and cups and silverware in the dishwasher. Two - I forgot how much I LOVED singing. My whole life throughout school was music, especially Choir in high school. Before I had little ears in the car you would find me driving with the music up so loud the license plate frame was shaking and I would be singing along just as obnoxiously loud; singing and listening to music really allows me a release for stress, and amazingly enough makes me feel better about the world.

#3 - my last goal 2 weeks ago - to try and fold the laundry the same day I took it out of the dryer. I tend to leave 2-3 hampers of clothes sitting and waiting to be folded because I just had a hard time making time to sit and fold it all and put it away. So far I'm definitely doing better than I was a month ago. In fact, right now there are 2 hampers sitting in our room from Sunday, but this is the first time in a while that has happened. It's a work in progress, but I figure any improvement is better than no improvement =)

And my goal starting today....

I have been MUCH better about making "home-made" meals more often and choosing meals based on the sales....and an unofficial goal I made was to try and made at LEAST 2 homemade meals every week.

To go along with that, I am making a goal to try at least one dessert recipe every week (to last through the week hopefully) since the homemade desserts are better for us than the store bought ones, and much cheaper!! AND I will post the dessert and recipe weekly for you to see!! So, below are the dessert recipes I tried this week...


Chocolate Picnic Cake
This recipe came from a Taste of Home magazine and I decided to give it a try on Friday since it was simple and I had all the ingredients...
This cake is described as being very versatile because it has no frosting, so is perfect for lunchboxes, and they saw it freezes well...and I think it would!! I actually added chocolate chips to the cake mix, but I don't think I would do it again, there were enough on the top!


Strawberry Cream Pie

This was the second recipe I decided to make on Sunday because I had a lot of fresh strawberries on hand and some extra heavy whipping cream hanging around....
We have yet to try this pie...it is in the fridge awaiting its fate after dinner tonight....but just from tasting the pre-fridge "batter" things looked promising!!
So, those are my desserts for this week. The chocolate cake is OK, I could see where it would be perfect for a kid's lunch, but I wouldn't make it as a dessert for company - it just doesn't have enough chocolate taste that us women expect from a dark dessert!! I will let you know soon what we thought of the Strawberry Pie.

Thursday, March 18, 2010

Green Velvet Cupcakes

Happy St. Patrick's Day!!
I present to you...
GREEN VELVET CUPCAKES!!!
A HUGE thank you to my friend Jessica for sharing this recipe with me.

I had tried a few red velvet recipes but they were never as good as I had hoped, then she shared this recipe with me. Just the fact that it had sour cream in it made me fall instantly in love!!
And after one bite, you'll be in love too!!
Here's the recipe:

2½ cups flour

½ cup unsweetened cocoa powder

1 tsp. baking soda

½ tsp. salt

1 cup (2 sticks) butter, softened

2 cups sugar

4 eggs

1 cup sour cream

½ cup milk

1 bottle (1 ounce) McCormick Red Food Color (or color of choice!!)

2 tsp. Vanilla Extract


PREPARATION:
Preheat oven to 350°. Mix flour, cocoa powder, baking soda and salt in medium bowl. Set aside.

Beat butter and sugar in a large bowl with an electric mixer on medium speed 5 minutes or until light and fluffy. Beat in eggs, one at a time. Mix in sour cream, milk, food color and vanilla.
Gradually beat in flour mixture on low speed until just blended. Do not overbeat. Spoon batter into paper-lined muffin cups, filling each cup two-thirds full.

Bake 20 to 25 minutes or until toothpick inserted into cupcake comes out clean. Cool in pans on wire rack 5 minutes. Remove from pans; cool completely. Frost with vanilla cream cheese frosting (optional).


A note from me - I actually put buttercream frosting on these puppies because I didn't want to worry about refrigerating them (not that they would have lasted long enough to have any LEFT to refrigerate, but you see my point!!).

This batter makes A LOT...I made 2 dozen cupcakes AND an 8x8 single layer cake (in a Pyrex pan).

Please leave a comment if you try the recipe and let us know what you thought. Make sure you watch them in the oven, I could see where if these get overcooked they wouldn't be nearly as good as they could be!! They are VERY moist and I can guarantee you'll want to keep plenty for yourself!!

Wednesday, March 3, 2010

Birthday fun


OK, so for our son's first birthday I decided to save the $40 I would have normally spent on a character cake from Albertson's and make one myself. This was my first attempt at any kind of cake decorating - and let's face it - it was for a 1-year-old's birthday party. This means it was a very cheesy themed Cars cake with not much detail...but it was cute for the kid and it was fun to try!!

Experience breeds excellence and I learned A LOT from just this one decorating experience!!!

- Despite how easy it is to make, DO NOT use marshmallow fondant for decorating a cake.....it sticks to EVERYTHING!!!!

- To get deep, rich colors you are going to use half the little container of colored gel dye....keep adding it, it will eventually turn the color you want - but don't be stingy on the amount!!

- It pays to have the right tools for the job - a rolling mat, a fondant roller, etc.

- You can never have enough powdered sugar when working with fondant, good thing it's cheap at Wal-Mart.

- A KitchenAid mixer has yet again proved to be a PRICELESS tool in my kitchen. I made the fondant in it, the frosting....the possibilities are endless!!

- Homemade buttercream frosting is 10 times better than any canned frosting!! And honestly, it is cheaper than the canned stuff in the long run!!!

- It's ok to use a box mix for the cake part - it saves you stress and allows you to focus on everything else!!

This was a lot of fun, and I can't wait to try again with all the new knowledge I've gained!! I already took a small cake I made and rolled out and covered it with some fondant. It was a bright yellow little piece of heaven!! It tasted yummy and looked super cute...I am working my way up to covering an entire cake with fondant!!!

A yummy looking recipe...

I haven't made these yet - my mother-in-law's recipe for cinnamon rolls is the best in the world and I don't want her to think I have abandoned her recipe....

This is a recipe for CHOCOLATE cinnamon rolls!!! How yummy does that sound?? Obvioulsy this was not meant to be eating as part of a healthy breakfast, I think it's more of a dessert.

So, sometime in the near future I will be trying these, and I will post pics!!

Chocolate Cinnamon Rolls

Friday, February 12, 2010

Red Velvet Cupcakes

So I've been wanting to try and tackle Red Velvet the past few months, and I tried a recipe from the ever-wonderful Pioneer Woman, but for whatever reason the cupcakes wouldn't cook all the way (I think it was my attempt at substituting for cake flour [which I now have a stock of in the kitchen]). Anyways, I found another recipe yesterday and I will post the link to it on here. They were good and they look pretty - but they could have been better. A friend of mine says she has a great recipe, so I'm going to try hers when she sends it!!
I also made Cream Cheese Frosting to top these and I even used the decorating kit for cupcakes that I got for Christmas. It made things SOOOO much easier than trying to spread on the frosting!!
Aren't these cute??
Karyl loved it...can you see the frosting on her nose?? She went right for the frosting first!!
These were super light and fluffy, and the red color was gorgeous!!!

My MIL's super-yummy meatloaf

Grandma B has an AWESOME recipe for meatloaf that I absolutely love. I made it about a month ago and took step-by-step pictures to post on here...and then just got lazy...
I am sorry, really I am....here is the recipe with the directions!!!
Preheat your over to 350 degrees

Here are all the ingredients that you'll need:
-About a pound of meat (I usually try to get closer to 1.25 pounds)
-1 egg
-A packet of Onion Soup Mix
-A small bottle of Russian Dressing (or the large if you're planning on using the rest for something else in the near future)
-Milk (enough to fill the small bottle of Russion Dressing half way - around 1 cup)
-Quaker Oats (the kind you use for oatmeal cookies...NOT instant oatmeal)
So, we'll start off easy...dump the defrosted meat into a decent size bowl
Then, crack that egg open and mix him up in to the meat
Once the egg is sufficiently combined, add the packet of Onion Soup mix....and mix...
Now, add the small bottle or Russian Dressing (or half the large bottle)...
Then fill up the bottle 1/2 way with milk and shake it up (with the lid back on of course), this way we get as much of the tangy Dressing flavor as possible, and we save ourselves from having to wash another measuring utensil from the milk!!

Then add about 2 good handfuls of oatmeal...enough that it makes a good showing throughout the entire lump of meaty uncooked meatloaf
This is what is will look like when it's all mixed...
then throw it into what I call a "bread loaf pan"
Our oven is horrible, not only is it smaller than a regular oven (it's like the Mini-Cooper of Ovens) but it heats weird, so I always have to cook things longer than usual....
That being said, I usually end up cooking mine for a little over an hour.
I would start with 40 minutes on your timer and check it...you want the edges to be dark and cooked, and the top to obviosuly be dark brown (like cooked meat). If you have a food thermometer, stick it in the dead center and look for it to read around 170 degrees. Otherwise, just stick a fork in the middle and spread it apart...does the inside look un-pink??
Keep in mind, there will look like there is a lot of "juice" bubbling around - and that is ok, this is a super moist (not mushy) meatloaf, so don't use the liquidity as a gauge for whether it's done or not. This one requires the un-pink test.
When it's done, pull it out of the oven, let it cool for a minute or two and then turn it upside down on to a serving plate (It might fall apart...that's OK - this guy is uber-moist and does not always allow for perfect slices, so it will never win a contest for it's visual appeal). It will be too big for a regular plate, so if you don't have something a little larger I would suggest just carefully cutting it in the pan and then sccoping it out.
So, that's our meatloaf!! Enjoy and please let me know if you give it a try!!